Please enter setup to recover bios setting что делать

доброго времени суток всем!
сегодня обнаружилась такая проблема: при загрузке компа выдается надпись «please enter setup to recover bios setting»
нужно сказать, что некоторое время назад у меня при загрузке (если комп достаточно долго постоит выключенным) виндовские часы начали перескакивать на сутки и более вперед. насколько я понял, проблема в загнувшейся батарейке на мат. плате.
собственно вопрос: может ли проблема с загрузкой также быть связана с батарейкой?возможно, есть какие-то иные причины? и вообще, насколько такая ситуация, так сказать, опасна?
мать — ASUS p5K-epu, ОС — win7x86
Заранее благодарен всем за отзывы!
P.S. только что обнаружил вот такую странную вещь. в списке устройств появился дисковод «А» (ранее его, естественно, не было)

Регистрация: 07.04.2012
Сообщений: 3
Репутация: 0
![]()
Привет. Вообщем попробуй сделать так:
1.Отключи от электричества сисетмник
2. Открой его вытащи батарейку
3. Возьми отвертку или иной металлический предмет с пласт ручкой и положи на мат плату так, чтобы конец отвертки (пример) касался железных контактов в отверстии для батарейки. Подожди минут 20. Затем вставиш батарейку и запускай компьютер.
Делал 1 раз — помогло. Но перед установкой нового винда.
Please enter setup to recover bios setting что делать
Останні статті і огляди
please enter setup to recover BIOS на Asus P8Z77-V LE
Вопросы по материнским платам, BIOS, UEFI, чипсетам
Повідомлення
Звідки: Запорожская губерния
Купил на неделе у нас на форуме профильную Asus P8Z77-V LE, обнаружилась проблема и теперь не знаю, возвращать мать назад или нет. Значит, при старте системы на мониторе появляется надпись — please enter setup to recover BIOS, нажимаю F1, вхожу в БИОС, потом F10, сохранить и грузится Винда. Если комп выключить, но не отключать от сети, то он нормально включается в последующие разы. Если же его обесточить, а потом вновь включить, то вновь появляется эта надпись. Да, ещё заметил, что время на часах в Винде сбивается — при включении компа через F1 время показывает то, какое было при выключении в предыдущий раз.
Поначалу я не беспокоился, т.к. сразу подумал на севшую батарейку. Замерял её мультиметром — действительно разряжена. Сегодня заменил на новую — проблема остаётся.
Сама плата без каких-либо внешних повреждений, всё остальное в ней вроде работает без проблем. БИОС последний, настройки сбрасывал на дефолтные. Вся остальная начинка системника 100% рабочая. Продавец проверенный, хотя пишет, что комплектующие не его, а друга, но подозревать его в продаже заведомо неисправного железа нет смысла. В общем — куда копать?
CG graphikos fan
Звідки: Украина
Please Enter Setup to Recover BIOS Setting – Top 8 Fixes!
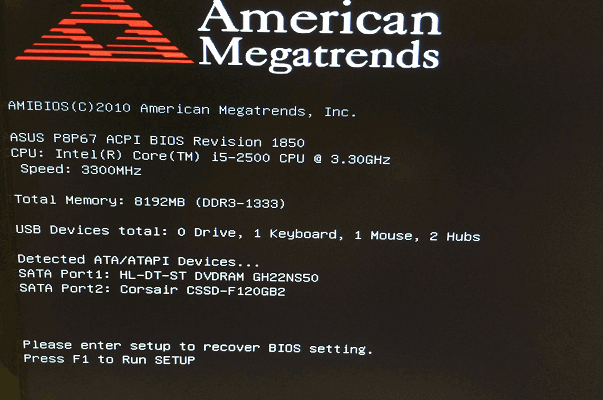
If your PC shows the message «Please enter setup to recover BIOS setting. Press F1 to Run SETUP» on your startup screen, you don’t need to worry. This post from MiniTool Partition Wizard provides some useful solutions for you to fix this error.
Causes of the Please Enter Setup to Recover BIOS Setting Error
Some people report that they receive the message “Please enter setup to recover BIOS setting. Press F1 to Run SETUP” on their screen each time they do a cold boot, as shown in the picture below.
What causes this “Please enter setup to recover BIOS setting” error? After investigating this particular issue, we find it can be caused by these possible reasons:
- The CMOS battery is dead.
- The BIOS on your PC is outdated.
- There are some system file corruptions on your PC.
- The settings in the BIOS do not match the real hardware data.
Below are some useful solutions that you can try to fix this “Please enter setup to recover BIOS setting” error.
![[Solved] Mfewfpk.sys Driver_IRQL_Not_Less_Or_Equal](https://www.partitionwizard.com/images/uploads/2022/10/mfewfpk-sys-driver-irql-not-less-or-equal-thumbnail.jpg)
[Solved] Mfewfpk.sys Driver_IRQL_Not_Less_Or_Equal
What is mfewfpk.sys? How to fix the mfewfpk.sys Driver_IRQL_Not_Less_Or_Equal error? You can find the answers in this post.
Fix 1. Restart Your PC
Restarting can wipe away the current state of the software. Any code that’s stuck in a misbehaving state will be swept away, too. So, the first thing you can try is to start your computer. If it doesn’t work for you, just try the other fixes below.
Fix 2. Change the Boot Order
You may also get the message “Please enter setup to recover BIOS setting. Press F1 to Run SETUP” if the BIOS was previously set to contain two hard drives but you neglected to change it back after you removed one of them.
In this case, you can try changing the boot order to the system disk as the first boot. Here’s the guide:
Step 1. Restart your computer and press the BIOS key to enter the BIOS menu on Windows 10.
Step 2. Navigate to the Boot tab in BIOS.
Step 3. Use the function keys to change the boot order.
- Left, Right, Up, and Down directional arrows: Switch between tabs or highlight items.
- Enter: Select highlighted items.
- Plus (+) or Page Up: Move highlighted items up a list.
- Minus (–) or Page Down: Move highlighted items down a list.
Step 4. Press the F10 key and Enter key to save the changes and exit.

WERInternalMetadata.xml Blue Screen — Top 10 Fixes
This post introduces what WERInternalMetadata.xml is, what causes the WERInternalMetadata.xml blue screen, and how to fix this issue on your PC.
Fix 3. Update BIOS to the Latest Version
Outdated BIOS can also cause this “Please enter setup to recover BIOS setting” error. You can check and update your BIOS version by reading this post: How to Update BIOS Windows 10 | How to Check BIOS Version.
However, it’s a little dangerous to update your BIOS because it may brick your system, so you’d better make a backup of your system. To do that, you can use MiniTool Partition Wizard’s Copy Partition Wizard or Copy Disk Wizard features. Here’s the tutorial:
Step 1. Download and install MiniTool Partition Wizard on your PC.
Step 2. Connect the external storage device to your computer and then launch MiniTool Partition Wizard.
Step 3. Select the Copy Disk Wizard option from the left sidebar.
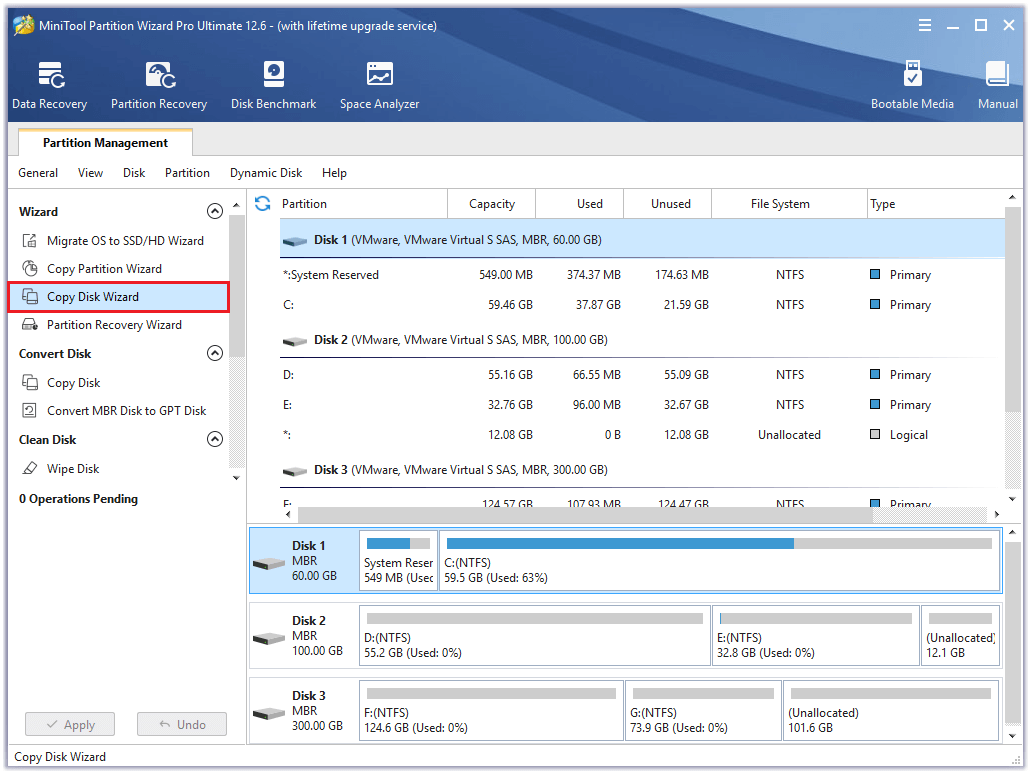
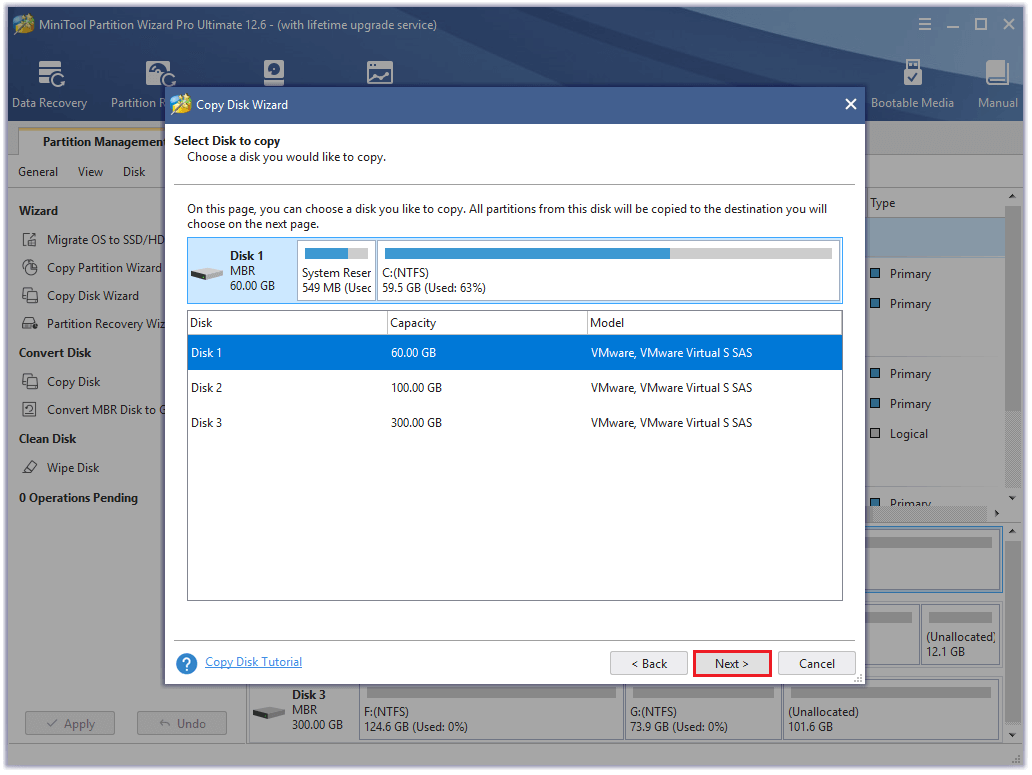
Step 4. Select the disk that you want to copy (Disk 1), and then click Next.
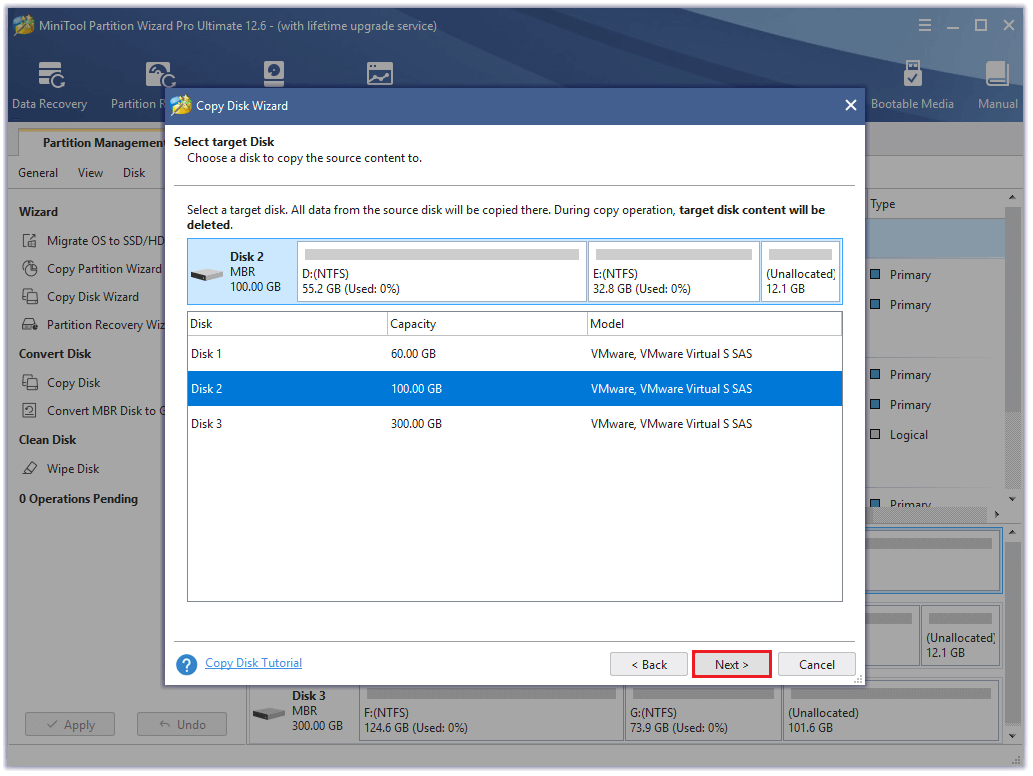
Step 5. Next, select the destination disk (Disk 2) and click the Next button. In the prompted window, click Yes if there’s no important data on it.
Step 6. Select copy options based on your needs and click Next. Click the Finish button on the next window.
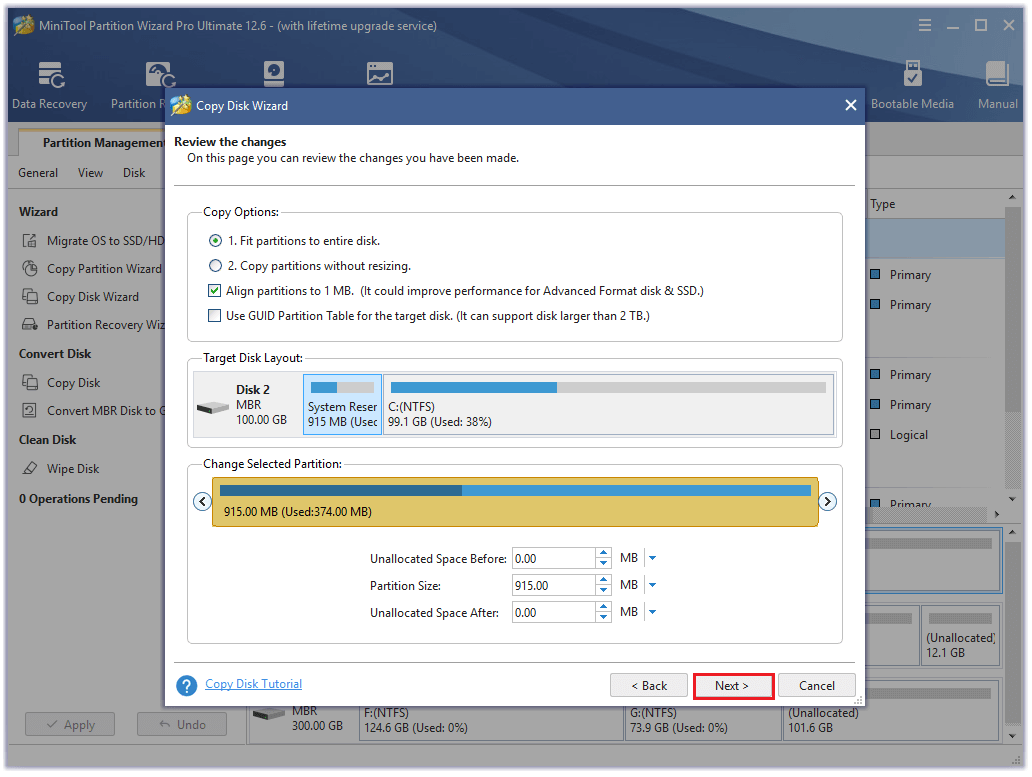
Step 7. Click Apply and Yes to execute your changes.
Fix 4. Clear CMOS by Using the Jumper Method
The complementary metal-oxide-semiconductor (CMOS) is a small amount of memory on a computer motherboard that stores the Basic Input/Output System (BIOS) settings. Sometimes, clearing CMOS by using the jumper method can help you recover the boards and fix errors like the “Please enter setup to recover BIOS setting” error. Here’s the guide:
- Power off your computer and disconnect it from the wall outlet.
- Press the Power button multiple times to clear any capacitors.
- Open your computer’s case so you can see the motherboard.
- Locate the CMOS jumper by referring to the motherboard manual and clear the CMOS. In general, the CMOS jumper consists of three pins located near the battery.
- In general, the CMOS jumper has positions 1-2 and 2- Move the jumper from the default positions 1-2 to positions 2-3 to clear CMOS. Wait 1-5 minutes, then move it back to the default position.
- Close the computer’s case, and then power on the system.
Fix 5. Replace the CMOS Battery and Change the F1 Settings
If your CMOS battery is out of power, you can also receive the message “Please enter setup to recover BIOS setting. Press F1 to Run SETUP” when you do a clean boot. To fix this, you can try replacing the CMOS battery and changing the F1 settings. Here’s how to do it:
- Enter the BIOS menu.
- Then press the F7 key to enter the Advanced Mode. (Different computers may need a different key to enter the Advanced Mode.)
- Go to the Boot tab and disable the Wait For “F1” If Error option.
- Next, press the Power button until the computer is turned off completely.
- Remove all the power sources and batteries.
- Make sure to release all the static electricity to avoid damaging your computer.
- Remove the bottom panel of the laptop.
- Take out the CMOS battery. It looks like a coin.
- Press the Power button on the laptop for 10-15 seconds to release the remaining power. This will reset the CMOS memory and your BIOS.
- Replace the CMOS battery, reassemble your laptop, plug the power source back, and boot up your laptop.
- Enter the BIOS again and reset the Time and Date. Next, press F10 and Enter to save the changes.
- Once done, check if the error is fixed.
Fix 6. Enable CSM
CSM is a component of your UEFI firmware, which stands for compatibility support module. It appears in the UEFI setup menu. Some people report that enabling CSM can fix this “Please enter setup to recover BIOS setting” error. You can also have a try.
If you want to know more about CSM, you can read this post: What Is CSM Support & Should I Enable It in BIOS? [Answered]. If you decide to enable the CSM, you can do as follows:
- Enter the BIOS menu on your PC.
- Navigate to Security Options and set Secure Boot to Disabled.
- Save the changes and restart your PC.
- Enter the BIOS again and go to the Boot tab.
- Set the Fast Boot to Disabled.
- Next, scroll down to the Launch CSM option and set it to Enabled.
- Save all the changes and restart your PC.
- Perform a cold boot of your PC and check if the error has been resolved. If you still see the error, please enter setup to recover BIOS settings and press F1 to run setup.
Fix 7. Change SATA Mode to AHCI
AHCI is an abbreviation for Advanced Host Controller Interface, which is defined by Intel. It is an operating mode in the BIOS settings of newer PCs that provides some advanced features to the Serial ATA standard.
AHCI can be used to access the native functions of the SATA interface, such as NCQ (Native Command Queuing) and hot plugging, which are beneficial to improving the compatibility and performance of your devices.
Some people report that changing SATA mode to AHCI works for the “Please enter setup to recover BIOS setting” error on their computer. Maybe it also works on your PC, so you can have a try. Here are the steps:
- Use the shortcut keys (F10, F2, F12, F1, DEL) to enter the BIOS menu.
- Navigate to the Boot tab, and then set the Launch CSM to Enabled.
- Next, go to the SATA Mode Selection section and change it to AHCI.
- Once done, reboot your PC and check if the “Please enter setup to recover BIOS setting” error is fixed.
What Does SATA Stand for? What Is SATA Drive?
What does SATA stand for? This post explains SATA meaning to you.
Fix 8. Ignore CPU Core Voltage
Ignoring CPU core voltage is a good choice to try fixing the “Please enter setup to recover BIOS setting” error, and you can also have a try. Here’s the way:
- Press the BIOS key to enter the BIOS menu.
- Then press F7 or another designated key to enter the Advanced Mode.
- Next, go to the Monitor tab and select the CPU Core Voltage option.
- Set it to Ignore.
- Save the changes and exit.
- Restart your PC and then check if you receive the message “Please enter setup to recover BIOS setting. Press F1 to Run SETUP” again.
Win 10 Setup Cannot Continue Due to A Corrupted Installation File
This post offers you 3 ways to resolve the error “Windows 10 Setup cannot continue due to a corrupted installation file”. you can choose one way accordingly.
Bottom Line
This post provides eight fixes to help you fix the “Please enter setup to recover BIOS setting” error. You can try these fixes to solve this error on your computer.
Do you know other methods to solve this error? Please share your ideas or experience with us in the following comment zone. In addition, if you encounter problems while using MiniTool Partition Wizard, please contact us via [email protected] . We will get back to you as soon as possible.
About The Author
Charlotte is a columnist who loves to help others solve errors in computer use. She is good at data recovery and disk & partition management, which includes copying partitions, formatting partitions, etc. Her articles are simple and easy to understand, so even people who know little about computers can understand. In her spare time, she likes reading books, listening to music, playing badminton, etc.
Помогите, компьютер при включении выдает ошибку Please enter Setup to recover bios setting
Auto-Detecting SATA3. IDE Hard Disk
SATA3 : WDC WD5000AAKS-00E4A0 05.01D05
Ultra DMA Mode-5, S.M.A.R.T. Capebаle and Status OK
Auto-detecting USB Mass Storage Devices ..
00 USB mass storage devices found and configured.
Please enter Setup to recover BIOS setting
Press F1 Run SETUP
Press F2 to load default values and continue
В данном случае подключена клавиатура с разъемом PS/2. При включении она моргнет 3-я фонариками и все, больше не реагирует, с USB похожая ситуация, только там вечно горит NumLock, CapsLock не реагирует вообще.
Перепробовал много способов:
1. Доставал батарейку — не работает
2. Доставал батарейку и переставлял джамперы (замыкал 2-3 контакты) — не работает.
3. Менял батарейку — не работает.
К стати, при отключении клавиатур высвечивается точно то же что сверху только нижний текст меняется, он уже с таймером в 10 секунд, по истечению запускается Восстановление после ошибок, (подключить в этот момент клавиатуру USB/PS2 не получается) соответственно автоматически выбирается запустить систему, а там дальше у меня на ЖД не до конца установленная «винда». Прочел что можно как-то в биосе отключить подобную тему, но не могу даже в биос зайти.
Система конечно старенькая, но хотелось бы все же запустить.
Может у кого-то была подобная проблема, подскажите как решили, или выкинули.
Заранее признателен
Лучший ответ

Принесли комп с такой надписью. Оказался замкнутым разъём USB на передней панели. Сдёрнул провод на материнке и всё заработало.