Невозможно экспортировать композицию с помощью Media Encoder
При добавлении композиции After Effects, созданной с помощью After Effects, в Adobe Media Encoder, визуализация не запускается в течение 3 секунд. Сам процесс визуализации может занимать более 8 часов.
Предлагаемое решение
Вы можете попробовать устранить эту проблему, выполнив следующие шаги.
Обновите After Effects и Adobe Media Encoder до последних версий, или убедитесь, что оба приложения имеют одинаковую версию. Например, если вы используете After Effects 2019, следует использовать Adobe Media Encoder 2019.
- Добавьте композицию в Adobe Media Encoder из очереди рендеринга After Effects.
- Выберите Композиция > Добавить в очередь рендеринга . В очереди рендеринга выберите Очередь в AME .
В Adobe Media Encoder выберите «Media Encoder CC > Установки > Общие» и отключите функцию «Разрешить параллельное кодирование» .
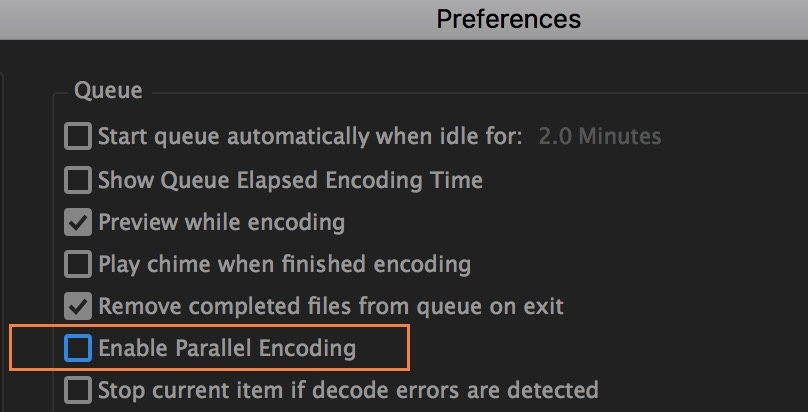
- В Adobe Media Encoder выберите «Media Encoder CC > Установки > Общие» .
- В группе «Рендеринг видео» измените «Модуль рендеринга» на «Использовать только Mercury Playback Engine» и нажмите «ОК» .

- Выйдите из Adobe Media Encoder и After Effects.
- Откройте программу Finder и, удерживая клавишу Option , выберите Перейти в строке меню.
- Выберите Библиотека и перейдите по пути Настройки> Adobe .
- Переименуйте папку Adobe Media Encoder в Old_Adobe Media Encoder .
- Закройте окно и перейдите в папку Документы > Adobe . Переименуйте папку Adobe Media Encoder в Old_Adobe Media Encoder .
Windows
- Откройте диалоговое окно Выполнить ( Win+R ) и введите в строку %appdata% .
- Откройте папку Adobe и переименуйте папку Adobe Media Encoder в Old_Adobe Media Encoder .
- Закройте окно и перейдите в папку Документы > Adobe . Переименуйте папку Adobe Media Encoder в Old_Adobe Media Encoder .
Очистите установку Adobe Media Encoder. Подробные сведения об очистке установки приведены в разделе Использование Creative Cloud Cleaner Tool для устранения неполадок при установке приложений.
[Solved] How to Fix “Adobe Media Encoder Is Not Installed”?
In this article offered by video converting software, we will explore some common problems related to Adobe Media Encoder not being installed or not working, and provide solutions to help you get back to your creative work.
Adobe Media Encoder is a powerful tool that allows users to convert video and audio files to various formats for playback on different devices. It is an essential component of Adobe’s Creative Cloud suite and is commonly used by video editors and other creative professionals. However, sometimes users may encounter issues where Adobe Media Encoder is not installed or not working properly, particularly when trying to use it with other Adobe applications like After Effects or Premiere Pro.
Why Adobe Media Encoder Is Important?
Adobe Media Encoder is a tool that allows users to convert video and audio files to different formats. It is important because different devices and platforms support different file formats, and without a tool like Adobe Media Encoder, users may not be able to properly share or distribute their video and audio content. Adobe Media Encoder can also be used to optimize files for playback on social media platforms, and to create custom presets for frequently used output settings.
One of the main advantages of Adobe Media Encoder is its ability to work with other Adobe applications, like Premiere Pro and After Effects. Users can send their projects directly from these applications to Adobe Media Encoder for rendering and conversion, without having to save and export their projects manually.
The Evolution of 4K Encoders and Decoders: Revolutionizing Video Streaming
What is a 4K encoder or 4K decoder? What types do they have? How to make use of 4K encoder/decoder to alter your video format?
Common Issues with Adobe Media Encoder
Despite its importance, users may sometimes encounter issues with Adobe Media Encoder. Some common problems include:
- Adobe Media Encoder is not installed.
- After Effects says Media Encoder is not installed.
- Adobe Media Encoder is not working properly.
- Adobe Media Encoder is not installed with Premiere Pro.
- Adobe Media Encoder is not installed on a cracked version of Adobe software.
Let’s take a closer look at each of these issues and what you can do to resolve them.
#1 Adobe Media Encoder Is Not Installed
If Adobe Media Encoder is not installed on your computer, you won’t be able to use it to convert or render video and audio files. This can happen if you have only installed a limited version of the Creative Cloud suite, or if you have uninstalled Adobe Media Encoder by mistake.
To check if Adobe Media Encoder is installed on your computer, follow these steps:
- Open the Creative Cloud desktop app.
- Click on the Apps tab.
- Look for Adobe Media Encoder in the list of installed apps. If it is not listed, it means it is not installed on your computer.
If you find that Adobe Media Encoder is not installed, you can easily install it by following these steps:
Step 1. Open the Creative Cloud desktop app.
Step 2. Click on the Apps tab.
Step 3. Scroll down to find Adobe Media Encoder.
Step 4. Click the Install button next to Adobe Media Encoder.
Step 5. Wait for the installation to complete.
Once the installation is complete, you should be able to use Adobe Media Encoder without any issues.
Adobe Media Encoder Not Activated & How to Get It for Free?
Adobe Media Encoder not activated, how to get Adobe Media Encoder without paying or Adobe Media Encoder free trial / alternative?
#2 After Effects Says Media Encoder Is Not Installed
If you are trying to render a video or audio file in After Effects and receive an error message that says “Adobe Media Encoder is not installed”, it means that After Effects is unable to communicate with Adobe Media Encoder.
To fix this issue, follow these steps:
Step 1. Open After Effects.
Step 2. Go to Edit > Preferences > General.
Step 3. In the Preferences window, look for the Media & Disk Cache section.
Step 4. Click on Edit next to Disk Cache.
Step 5. In the Disk Cache Settings window, click on Clean Database & Cache.
Step 6. Close After Effects and restart your computer.
Step 7. Open After Effects and try to render your video or audio file again.
If the issue persists, you may need to reinstall Adobe Media Encoder as described in the previous section.
#3 Adobe Media Encoder Is Not Working Properly
If Adobe Media Encoder is installed but not working properly, there are several potential reasons for this. One common issue is that Adobe Media Encoder may be running out of memory or other system resources, which can cause it to crash or freeze.
To fix this issue, try closing any other applications that may be running and taking up system resources, and then restart Adobe Media Encoder. You may also want to check that your computer meets the minimum system requirements for Adobe Media Encoder, as specified by Adobe.
Another potential issue is that there may be a problem with your source media files, such as corrupted or damaged files. If this is the case, you may need to repair or replace the affected files before attempting to encode them with Adobe Media Encoder.
![[9 Ways] Fix Adobe Media Encoder Not Connecting to Project](https://images.minitool.com/videoconvert.minitool.com/images/uploads/2023/03/adobe-media-encoder-not-connecting-to-project-thumbnail.png)
[9 Ways] Fix Adobe Media Encoder Not Connecting to Project
Why is Adobe Media Encoder stuck on connecting to project? How to solve this problem? What fixes can we use? Find workable solutions here!
#4 Adobe Media Encoder Is Not Installed with Premiere Pro
If you have installed Premiere Pro but Adobe Media Encoder is not listed as an installed app, it is possible that you may have installed a version of Premiere Pro that does not include Adobe Media Encoder.
To check if Adobe Media Encoder is included with your version of Premiere Pro, follow these steps:
- Open the Creative Cloud desktop app.
- Click on the Apps
- Look for Premiere Pro in the list of installed apps.
- Click on the three dots next to Premiere Pro and select View Details.
- Check the Components section to see if Adobe Media Encoder is listed.
If Adobe Media Encoder is not listed, it means that it is not included with your version of Premiere Pro. In this case, you can follow the instructions in section 1 to install Adobe Media Encoder separately.
#5 Adobe Media Encoder Is Not Installed on A Cracked Version of Adobe Software
Some users may attempt to use a cracked version of Adobe software that includes Adobe Media Encoder, rather than paying for a legitimate license. However, this can lead to a variety of issues, including the risk of malware or other security vulnerabilities, as well as the possibility that the software may not work properly.
If you are using a cracked version of Adobe software and are experiencing issues with Adobe Media Encoder, it is possible that the crack may have modified the software in a way that prevents it from working properly. In this case, the best course of action is to uninstall the cracked version of Adobe software and replace it with a legitimate license.
![[7+1 Ways] How to Fix Adobe Media Encoder Error Code 3?](https://images.minitool.com/videoconvert.minitool.com/images/uploads/2023/03/adobe-media-encoder-error-code-3-thumbnail.png)
[7+1 Ways] How to Fix Adobe Media Encoder Error Code 3?
Have you ever encountered Error Code 3 while using Adobe Media Encoder alone or together with Adobe Premiere Pro? How do you solve it?
Replace Adobe Media Encoder with Its Alternatives
If your situation belongs to none of the above-described ones and you can’t find a working solution. Stop bothering yourself with unlimited searching and boring reading. Just make your decision to take advantage of one of the replacements of Adobe Media Encoder, such as MiniTool Video Converter, a professional and easy-to-use media files encoder that can convert videos and audio from one format to another.
To learn how to make use of MiniTool Video Converter to encode a media file, follow this guide.
Step 1. Download, install, and launch MiniTool Video Converter on your Windows computer.
Step 2. In its main user interface (UI), under the default Video Convert main tab, click the Add or Drag files here to start conversion option to upload the target video or audio file that you would like to reencode with.
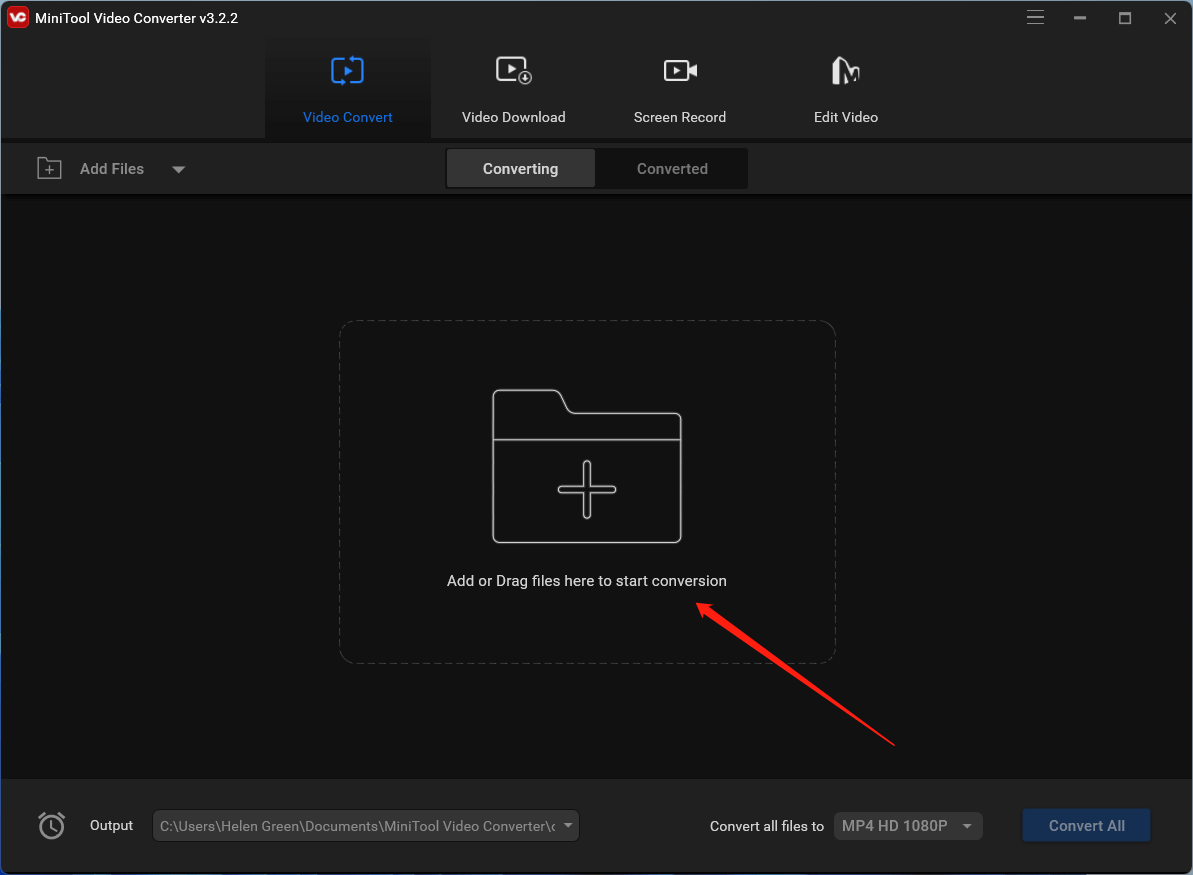
Step 3. Then, a task will be listed in the main window. There, you can click the settings icon behind the Target to customize the File Name and Output address of the converted video.
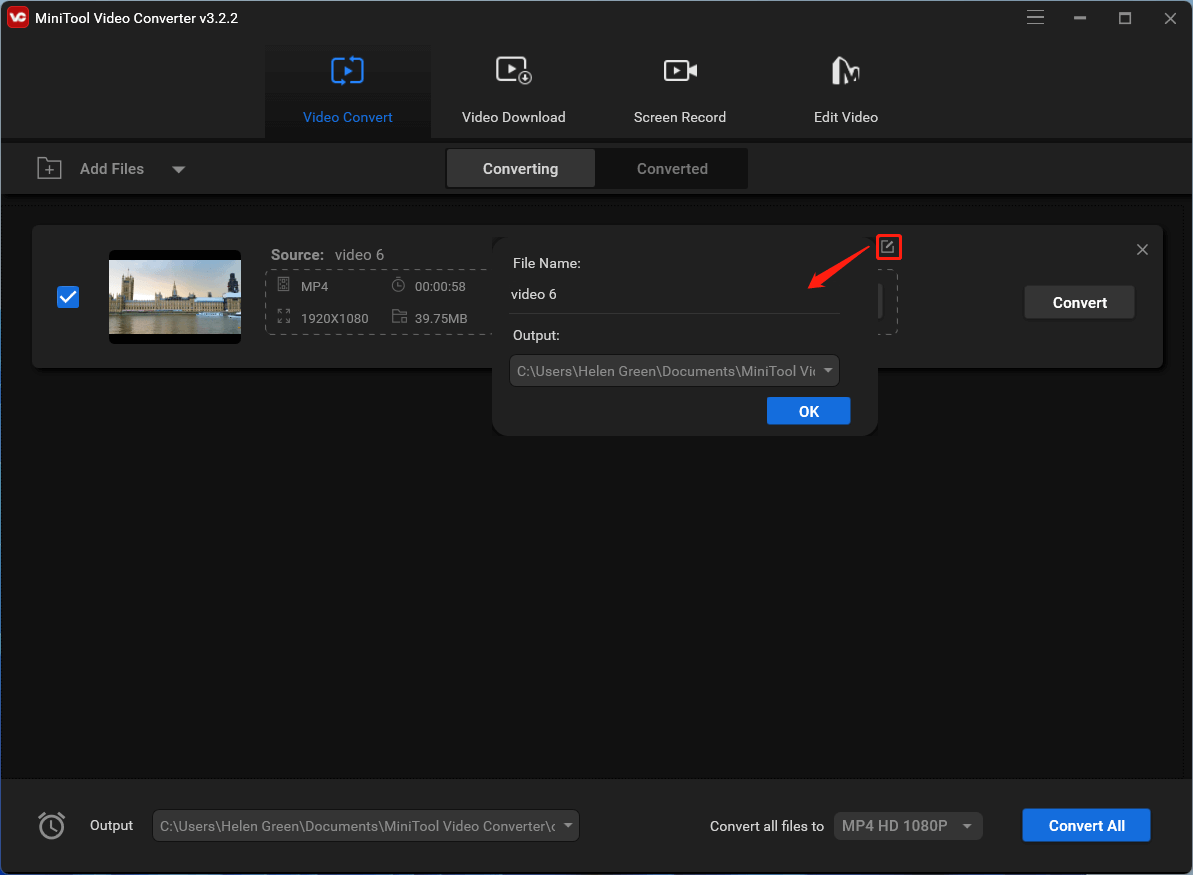
Step 4. Click the settings icon under the Target to trigger a format settings window. Within the window, move to the Video tab from the top menu and select your desired format in the left panel. Then, choose a video resolution. You can further specify the format parameters by clicking the settings icon behind the selected resolution. Or, you can directly choose the Create Custom option in the bottom right corner of the window to fully personalize your target video formats.
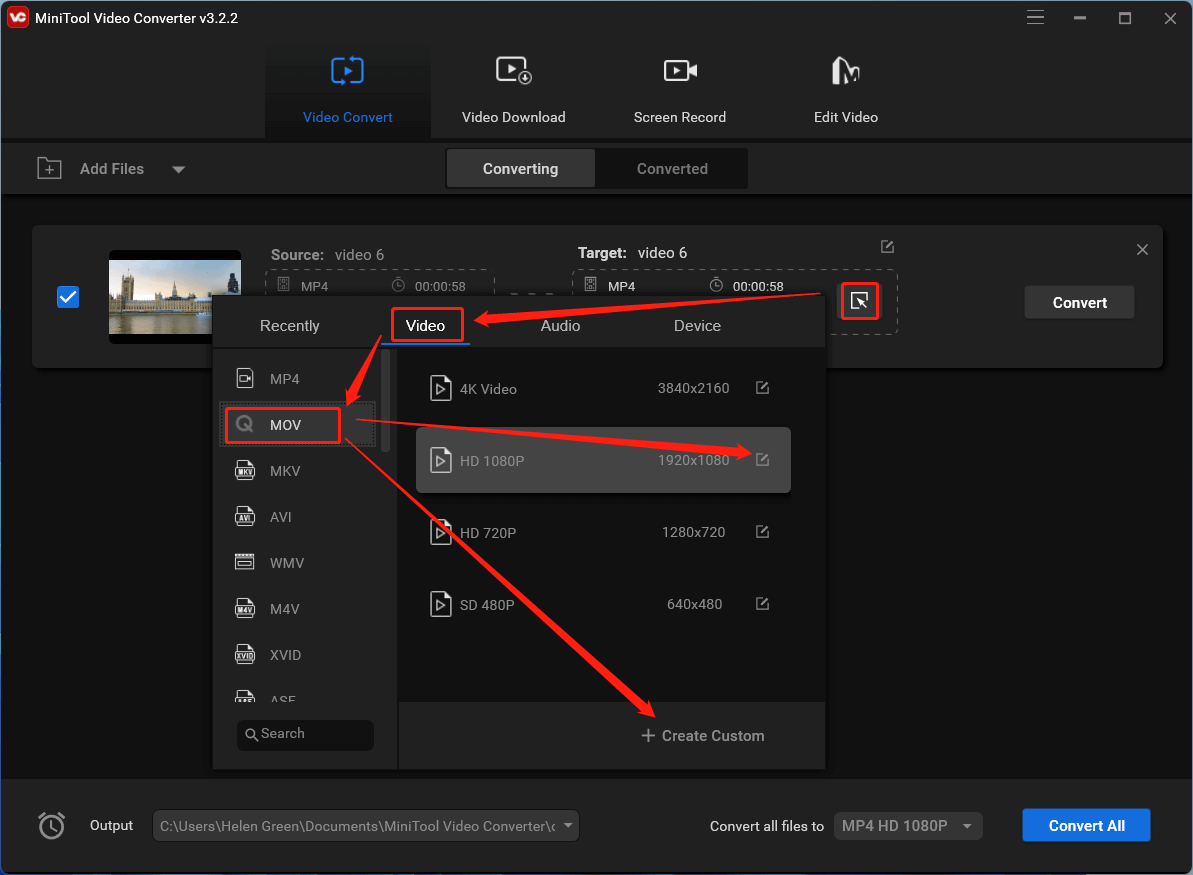
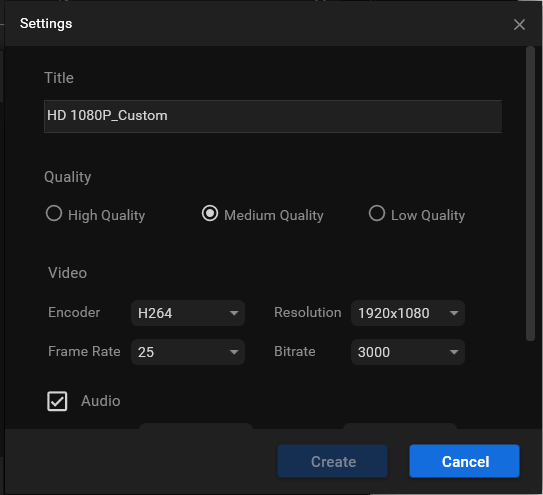
Step 5. Then, a new popup will appear. There, you are able to specify the title, quality, video encoder, video resolution, video frame rate, video bitrate, audio encoder, audio channel, audio sample rate, as well as the audio bitrate of the converted video.
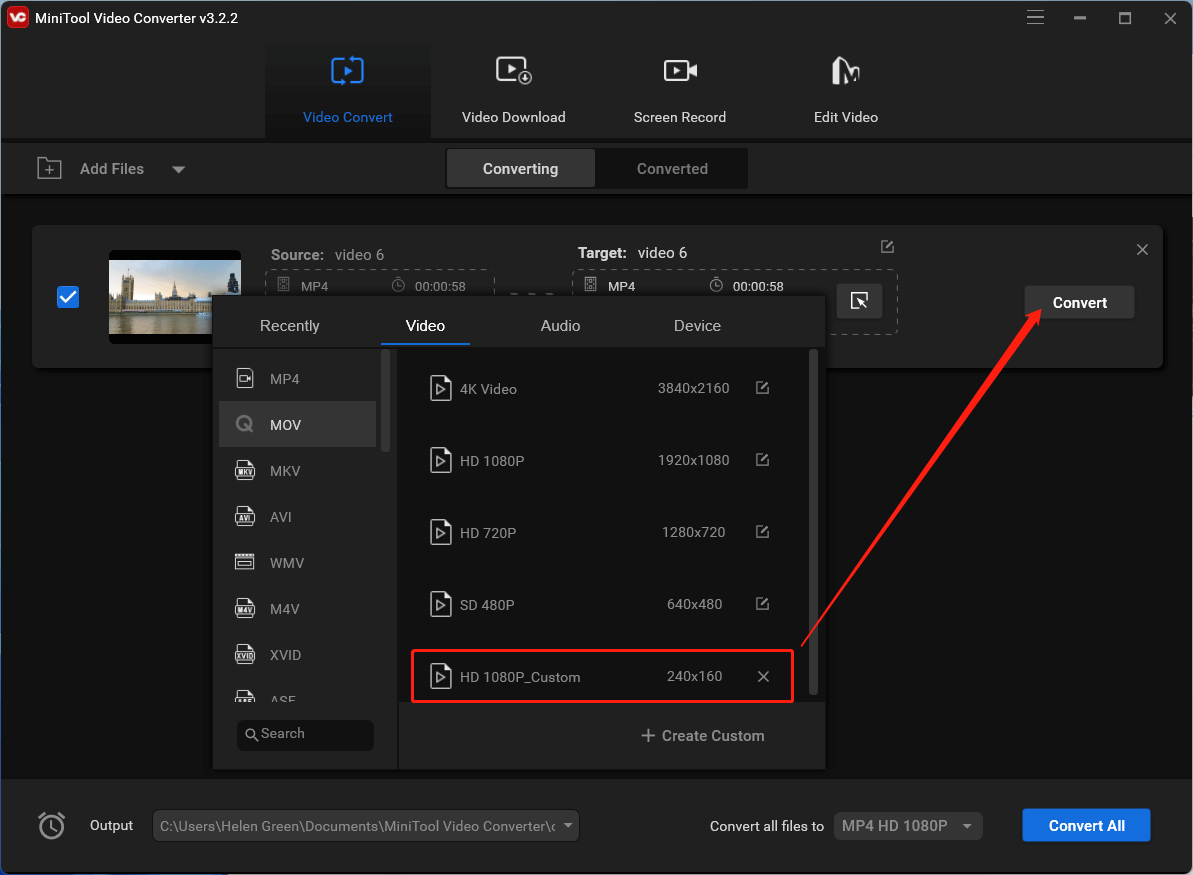
Step 6. If you have customized a target video format all by yourself, after you click the Create button in the above screen to save your settings, a new video format option will appear in the available choice list. There, just pick up the option and click Convert in the main window.
Then, wait patiently for the success of the conversion. It may take some time to complete the task. How much time will it spend depends on how larger the target media file is. The larger the longer. Also, the hardware equipment of your PC is a matter that can influence the duration of the video converting process. Yet, MiniTool Video Converter is a powerful program that can quickly handle your mission while ensuring success.
In addition to video/audio conversion, MiniTool Video Converter can also record computer screens for you and assist you to download videos from YouTube. To explore its more features, just download this free app and have a try!
Conclusion
Adobe Media Encoder is an essential tool for video and audio professionals, but it can sometimes encounter issues, such as not being installed, not working properly, or not being included with other Adobe applications. By following the steps outlined in this article, you should be able to resolve these issues and get back to creating high-quality video and audio content. Remember to always use legitimate software to ensure the best possible experience and to avoid security risks.
Related Articles
- 5 Ways to Fix Adobe Media Encoder Crashes When Rendering
- [5 Ways] How to Fix Adobe Media Encoder Not Working Issues?
- Fix Adobe Media Encoder Error Code: -1609629695 and Similar Issue
- Do I Need Adobe Media Encoder & What Can Media Encoder Do?
- Microsoft Expression Encoder: A Comprehensive Tool for Video Encoding and Screen Capture
About The Author
Helen Graduated from university in 2014 and started working as a tech editor in the same year. Her articles focus on video creation, editing, and conversion. She also has a good knowledge of disk management and data backup & recovery. Through an in-depth exploration of computer technology, Helen has successfully helped thousands of users solve their annoying problems.
How to Fix Adobe Media Encoder Not Installed Error in Premiere/AE
Adobe Media Encoder helps ingest, transcode, output, and publish the media in any form from Adobe Premiere Pro, After Effects, Photoshop and other Adobe software components. While many users complain about the Adobe Media Encoder not installed error while they’re trying to send a render to Media Encoder. But it was installed. Why is this happening? How to fix the «Adobe Media Encoder is not installed» error? Scroll down to find the answer.
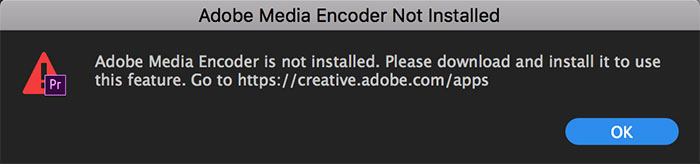
Table to Content
- Part 1: What Causes «Adobe Media Encoder is Not Installed» Error?
- Part 2: How to Fix Adobe Media Encoder Not Installed Error?
Part 1: What Causes «Adobe Media Encoder is Not Installed» Error?
There are many causes for Adobe Media Encoder not opening when you send a render to it, from the software itself to the install settings. Here are some of the most likely ones:
- You really don’t have the Adobe Media Encoder installed on your computer. For that, you would have to download and install it before you start using all features of Adobe Premiere Pro, After Effects, Lightroom and more.
- You have a corrupted installation. You may even not know it, but installations can be corrupted potentially if they are moved from one drive to another.
- Adobe Media Encoder is not preset in the default location. This can interfere with the proper use of the other Adobe software components.
- Old version of Adobe Media Encoder. Make sure you’ve upgraded the latest builds of Adobe Media Encoder, or else you might experience the error message. Moreover, it requires the same version of both applications like Adobe Premiere Pro and Media Encoder to queue the export.
- You download free Adobe Media Encoder software from a third-party site.
Part 2: How to Fix Adobe Media Encoder Not Installed Error?
According to the reasons analyzed above, we can apply the medicine to the case.
Solution 1: Installing Adobe Media Encoder
If you haven’t got Adobe Media Encoder installed on your computer, it’s not surprising to get this error message at all. All you need to do is to download and install it.
- Navigate to Adobe Media Encoder official site or go to Adobe Creative Cloud to and download the application.
- Right-click the downloaded file and choose Run as administrator. Restart your computer after installing and check if the error message is resolved.
Note: DO NOT change the default location of Adobe Media Encoder after installation!
Solution 2: Update Adobe Media Encoder
You can update installed Adobe apps including Media Encoder automatically or manually. Here are the specific steps:
1. Keep Adobe Media Encoder updated automatically.
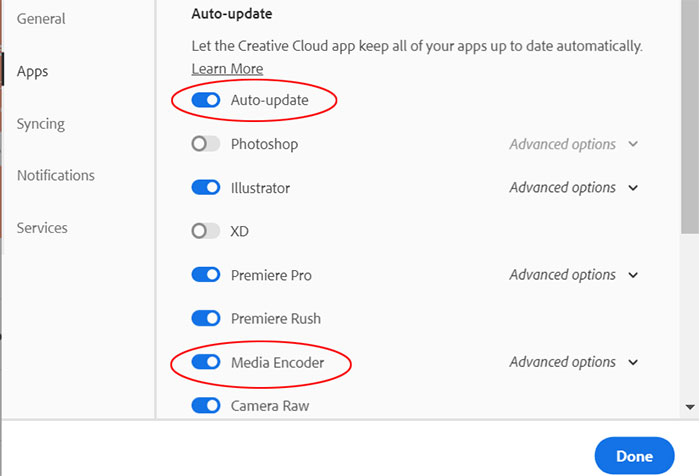
- Open the Creative Cloud desktop app. Select the Account icon and then select Preferences.
- Select the Apps tab and turn on the Auto-update for all apps of Adobe software. Or choose the specific app like Media Encoder and turn on the Auto-update.
- Click Done button when you’re finished.
2. Check the latest version of Media Encoder manually.
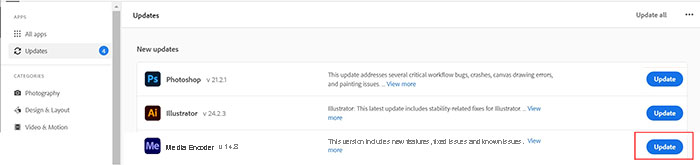
- Open the Creative Cloud desktop app as well.
- Select Updates in the left pane of the Apps tab.
- Select the . more icon, and then click on Check for updates.
- Find Media Encoder and click Update button to upgrade it to the latest version.
If you have upgraded Adobe Media Encoder to the latest version, Adobe Premiere Pro still won’t queue to Media Encoder. It might be an issue of the Premiere Pro. It requires the same version of both applications to queue the export. Thus you can update Premiere Pro to the latest version or install previous versions of Media Encoder.
What If «Adobe Media Encoder Not Installed» Error Still Not Resolved?
If Adobe Media Encoder is still not working to queue to export after the above tips, you may need to consider another alternative to export your media. Winxvideo AI could be a nice choice for transcode and export video files. It converts 4K/HD videos to MP4, MOV, AVI, MKV, WMV, iPhone, iPad, PS5, Apple TV and 420+ profiles without any issues.
Free Download for Win 7 or later
Free Download for Mac OS X 10.6 or later
Better yet, it’s fairly easy. All can be done within 3 steps.
Step 1: Launch Winxvideo AI and click Video Converter to enter the video transcoding interface. Then click +Video button to load your target video.
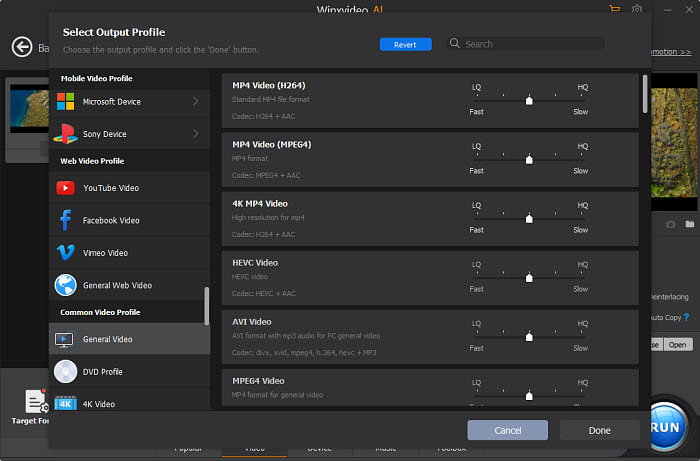
Step 2: Choose an output format, such as MP4 Video. You can do this at the Target Format section, or directly click Target Format icon to get more preset profiles.
Step 3: Click Browse button if necessary. Then Tap RUN button to start the conversion.
Other Useful How-to Guides
[Solved] Can’t Import MKV Videos to Adobe Media Encoder
Your MKV files cannot be opened/read in Adobe Media Encoder for further encoding? Now your issue will be fixed here with the easiest solution.
Fixed: Adobe Premiere Pro Won’t Import HEVC Videos Properly
Your Adobe Premiere Pro will not properly import HEVC videos produced by iPhone, Android, DSLR, GoPro, Dji, Final Cut Pro and more, even if the format is supported? Never mind. Your issue will be fixed with easy solutions here.
[Solved] Can’t Import MOV Files to Premiere Pro (CC)
Codec missing or unavailable when importing MOV to Premiere Pro (CC)/Elements? Quick fixes are available here to solve MOV not importing to Premiere issue.
Adobe Media Encoder WebM: How to Import/Export WebM
WebM not showing in Adobe Media Encoder? Or failed to export WebM files in Media Encoder? That’s probably because your AME doesn’t have WebM support. Follow this article to learn how to add WebM support to AME.
ABOUT THE AUTHOR

Jack Watt 
Jack Watt is a sought-after editor at Digiarty. He is responsible for digital and multimedia world, delivering definitive video and audio related software reviews, enlightening guides, and incisive analysis. As a fan of Apple, Jack Watt also brings his experience to more readers and focuses on writing of the Apple ecosystem at large.
Home > Video > Software Solutions > Adobe Media Encoder Not Installed
Digiarty Software is a leading multimedia software provider, delivering easy-to-use and innovative multimedia solutions to users all over the world.
Product
- Winxvideo AI
- WinX DVD Ripper
- WinX DVD Copy
- WinX MediaTrans
Tips and Tricks
- DVD Topics
- Video Resources
- Data Transfer
- Tips and Glossary
Ошибка Adobe Media Encoder не установлен
Adobe Media Encoder – это мощный инструмент предназначен для перекодировки мультимедийных файлов в любой формат. Но иногда при работе с приложением можно столкнуться с ошибкой, что Media Encoder не установлен. Ошибка проявляет себя в двух случаях: когда приложение установлено и во время обращения с другой программы.
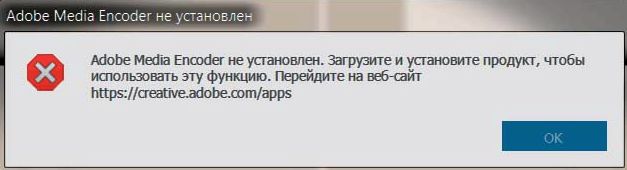
Почему возникает ошибка
Есть несколько причин, из-за которых система выбрасывает уведомление, когда не может получить доступ к приложению.
- Программа не установлена. Наиболее распространенный случай, когда действительно Media Encoder не установлен на компьютере. Для начала нужно загрузить и установить его, прежде чем использовать все функции программного обеспечения.
- Установочные файлы повреждены. Иногда установка может быть повреждена при переносе с диска на диск или другой носитель.
- Изменен каталог установки. Программа должна быть установлена в папку по умолчанию для правильного использования всеми продуктами Adobe.
- Версия сильно устарела. При использовании устаревшей версии одного из приложений может возникнуть уведомление об ошибке. Поэтому проверьте, что на компьютере установлены последние сборки.
Прежде чем приступить к решению проблемы, нужно войти в систему как администратор и проверить подключение к интернету. Также должна быть актуальная подписка на Creative Cloud.
Установка Media Encoder
Уведомление об ошибке вполне уместно, если действительно не установлено приложение Media Encoder. Некоторые продукты Adobe требуют функцию кодирования для полной функциональности.
Перейдите на официальный сайт Media Encoder и загрузите установку в любое место на диске. Также программу можно загрузить прямо из Creative Cloud.
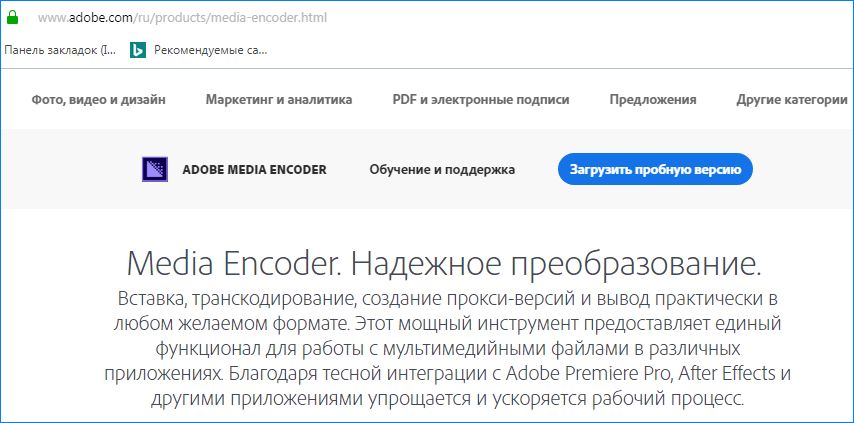
Кликните правой кнопкой мыши на исполняемый файл, выберите «Запуск от имени администратора». После установки перезагрузите компьютер и проверьте, остается ли проблема.
Каталог установки по умолчанию
Приложение не будет правильно работать, если изменить его расположение вручную путем копирования и вставки. Файлы реестра и параметры могут прерваться после перемещения программы в другую папку. Через изменение расположения он не будет правильно зарегистрирован в системе.
Для решения проблемы попробуйте вручную переместить приложение обратно в каталог по умолчанию:
Если после переноса ошибка остается нужно выполнить такие действия:
Откройте Creative Cloud и удалите все программы, которые переместили вручную в другое место.
После завершения заново установите приложение из Creative Cloud. Прежде проверьте, что каталог назначен по умолчанию. Нажмите на значок шестеренки в верхнем правом углу, затем выберите «Установки». Здесь проверьте правильно ли выбран каталог.

После переустановки перезагрузите компьютер. Проверьте, остается ли проблема.
Изменение каталога установки через командную строку
Ошибка часто проявляет себя, когда программное обеспечение Adobe (например, After Effects) и Media Encoder установлены в разных каталогах. Нужно вручную изменить каталог и исправить неправильную конфигурацию. Вы можете следовать этому решению, если, например, After Effects размещен на C:, а Encoder на другом диске.
Во-первых, убедитесь, что версии компонентов обоих модулей совместимы друг с другом.
Затем выведите на экран строку системного поиска нажатием на клавиши Windows + S, наберите команду cmd . Когда отобразится найденный результат, кликните по нему правой кнопкой мыши и выберите запуск от имени администратора.
В консоли командной строки введите команду:
mklink /J «(буква системного диска):\Program Files\Adobe\Adobe Media Encoder CC (версия)» «(буква диска, где по факту расположена программа):\Adobe\ Adobe Media Encoder CC (версия)»

После выполнения команду получите подтверждение создания символьной ссылки. Перезагрузите компьютер, и откройте приложение. Посмотрите, удалось ли исправить ошибку.
Удаление продуктов Adobe CC
Если все перечисленные методы не работают, то возможно продукты СС повреждены или имеют неправильную структуру. Для этого их нужно полностью удалить, а затем попробовать переустановить их заново. Для этого решения потребуется учетная запись Creative Cloud.
Откройте официальный сайт Adobe CC Cleaner Tool. Затем выберите версию установленной на ПК операционной системы. В нашем случае Windows.

После выбора ОС выполните следующие действия. Нажмите комбинацию Windows + R, впишите команду appwiz.cpl и подтвердите вход в раздел Удаления / Изменения программ. Найдите Adobe CC и после клика по нему правой кнопкой мыши выберите «Удалить».
Теперь перейдите к 6-му шагу и загрузите исполняемый файл в доступное место.

После завершения загрузки кликните правой кнопкой мыши по исполняемому файлу и выберите Запуск от имени администратора. Отобразится командная строка со списком параметров. Выберите вариант в соответствии с проблемой и нажмите Enter.

Теперь инструмент очистки полностью удалит программу с компьютера.
Перезагрузите ПК и снова установите Creative Cloud. Затем инсталлируйте инструменты, включая Media Encoder и проверьте, возникает ли ошибка.